Prerequisite
- You have an AWS account with billing enabled.
- You have installed the AWS CLI on your local computer, except if you use the AWS cloud shell from your management console. Install and update AWS CLI
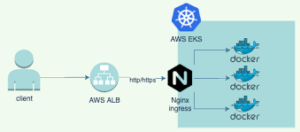
We have an existing containerized application setup in the GitHub link below. This app is intended to run 2 client servers, 2 backend servers, 1 worker server where calculations for the application will be made, 1 Redis server, and 1 Postgres server.
Don’t worry, you won’t be building the application from scratch; the application files and modules have been created, and the application image has been deployed to Docker Hub. The files available in the GitHub repo are just the cluster configuration files for Kubernetes.
We will be working with AWS CLI, although you can use the cloudshell to do the configuration just as illustrated in this article.
Let’s get started
Clone the repo to your local computer or the console environment if you’re using the console command line.
git clone https://github.com/willie191998/Kubernetes-cluster-ingress-nginx/
Set up roles and user
You need to set up a role for your node group, a role for your EKS cluster, and a role for your local command-line user access. If you are using Cloudshell, you need to ensure your user has the minimum permissions to carry out this activity.
Setup Local Command Line user
I assume you already have a command line user for using AWS CLI. However, depending on the permissions you’ve granted this user, you might want to review them to ensure they have the necessary access to create, modify, and interact with the resources used in this tutorial.
Personally, I couldn’t figure out the exact permissions to add to my user, so I temporarily gave them administrative access and removed it once I was done. Giving administrative permissions to a command line user is risky, so be sure to limit these permissions whenever possible.
Setup EKS role
- Navigate to your IAM dashboard from the search box
- Select Roles from the IAM dashboard, and click Create Role.
- Choose AWS Service as the trusted entity type, select Elastic Kubernetes Service (EKS) from the list of services, and click Next.
- In the Attach permissions policies section, search for and select the appropriate policies for your EKS cluster, AmazonEKSClusterPolicy, AmazonEKSServicePolicy, and Click Next.
- Review and click Create role.
Setup EC2 Nodegroup role
- Navigate to your IAM dashboard from the search box
- Select Roles from the IAM dashboard, and click Create Role.
- Choose AWS Service as the trusted entity type, select Elastic Compute Cloud (EC2) from the list of services, and click Next.
- In the Attach permissions policies section, search for and select the appropriate policies for your EKS cluster, AmazonEKSWorkerNodePolicy, AmazonEKS_CNI_Policy, AmazonEC2ContainerRegistryReadOnly, Click Next.
- Review and click Create role.
Set up infrastructure and platform
- After installing the AWS CLI, configure it by running aws configure. Enter your user access key ID and secret access key. You’ll be prompted to set a default region; use the short representation for the region, such as eu-west-3 for Paris.
- Create the EKS cluster from your command line; otherwise, you won’t be able to deploy files to it using your command line user. Changing the user later is possible but stressful and tedious. Here’s a forum discussion of the issue: https://repost.aws/knowledge-center/eks-api-server-unauthorized-error
aws eks create-cluster --name <cluster-name> --role-arn role-arn --resources-vpc-config "subnetIds=subnet1,subnet2,securityGroupIds=sg-1"Replace cluster-name, role-arn, subnet1, subnet2, sg-1 with appropriate values.
Confirm that your cluster has been provisioned and active before you continue.

- Set Kubectl to be based on your cluster when you use it.
aws eks --region <your-region> update-kubeconfig --name <your-cluster-name>Confirm the config context for kubectl rightnow, run,
kubectl config get-contextsThe context should be the arn of your EKS cluster.
- Set up a namespace file, you can name it anything you want, and save it as a file.
apiVersion: v1
kind: Namespace
metadata:
  name: my-namespace
Change the name in the file appropriately, Apply namespace.
kubectl apply -f my-namespace.yaml
I didn’t use a namespace because I was only working on one cluster, so all my instances and deployments were stored in the default namespace. However, I urge you to use namespaces to prevent future errors.
- Create your node group if it hasn’t been created yet. To check if a node group already exists, open your EKS cluster, select Compute from the options at the bottom, then select Nodegroup. If there’s none, click Create.
- Give your node group a name, select the role you created for the EC2 node group, and select the instance type for it, T2.micro if you want to benefit from the free tier, set the maximum, required, the minimum number of nodes, mine was 4, 14, 15 respectively. Now you can create your node group and confirm that it’s active.

- Deploy your cluster configuration files. These files contain definitions for deployments and services in the cluster. As long as you haven’t added any new files to the folder, you can run the command below to create the deployments and services as defined on one run.
Kubectl apply –f ./k8s
Else you create all services and deployment individually, like this
Kubectl apply –f client-cluster-ip-service.yaml
Kubectl apply –f client-deployment.yaml
Do the same for Redis, postgres, worker, and server files.
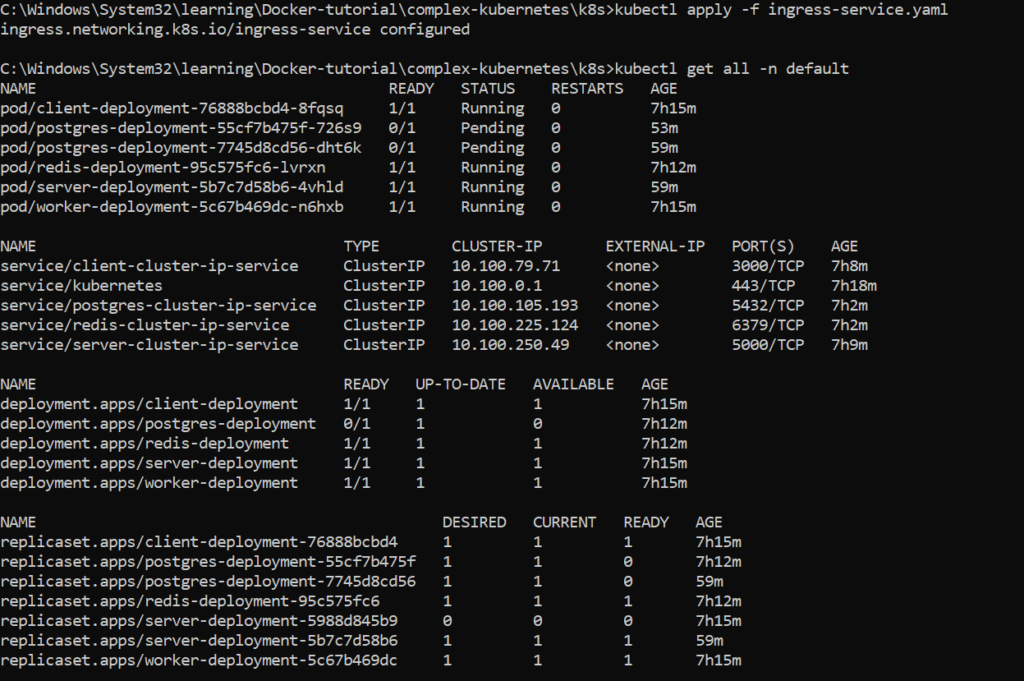
Confirm your deployments, services are running with the command below.
kubectl get all –n <namespace>
You would see all the deployed pods, deployments, services, etc. Note that you should replace the namespace in the command above with your actual namespace.
Confirm that the pods are ready and not just created as shown in the image below else run the command to recreate the deployment or service.
Now your cluster is running but you cannot access them via an IP address or DNS link because they were not configured to receive traffic from external sources directly.
- To receive traffic you need to enable Ingress-NGINX, an open source project developed by the Kubernetes community.
Ingress-NGINX controller will create an external load balancer outside your cluster, a nginx server which we will configure very soon to send traffic to our deployments.
Configure the Ingress-NGINX controller, download the file from the terminal
I used Windows so this command did not work from the command prompt so I used WSL terminal to download the content into this folder k8s.
Various ways of configuring Ingress-NGINX depend on your local OS, cloud provider (AWS, Azure, GCP), local testing, etc. See the main documentation page here (https://kubernetes.github.io/ingress-nginx/deploy/)
After downloading the file, we need to configure it as stated in the documentation for AWS. Open the file downloaded, deploy.yaml, and get ready to edit.
- Locate proxy-real-ip-cidr at about line 329 for me, should be around that line for you. You are required to change that value there to the CIDR block of your VPC.

- Locate service.beta.kubernetes.io/aws-load-balancer-ssl-cert at around line 348. Remove the dummy value there arn:x:x:… to the arn of an AWS verified domain certificate. The certificate I use is associated with another server/website entirely, but it worked fine provided it was verified.

- Save your changes and create the ingress-nginx controller
Kubectl apply –f deploy.yamlYou should see that different pods and services are created successfully.
Confirm Ingress-NGINX is running
kubectl get all -n ingress-nginxYou should see details of a newly deployed load balancer which you can confirm when you go to your EC2 dashboard then, select load balancer at the bottom left, you should see one created by your Ingress-NGINX.
Wait for your load balancer to become active then copy its DNS address and enter it on a browser tab, if everything has worked correctly you will see a default NGINX 404 page.


- The default NGINX page you see is a default end page created by ingress-nginx to serve as the endpoint when you have yet to configure the NGINX server.
To configure the ingress-nginx controller, you need an ingress file which is given below. It was made to enable NGINX networking for our project.
apiVersion: networking.k8s.io/v1
kind: Ingress
metadata:
  name: ingress-service
  namespace: default
  annotations:
    kubernetes.io/ingress.class: nginx
    nginx.ingress.kubernetes.io/use-regex: 'true'
    nginx.ingress.kubernetes.io/rewrite-target: /$2
    # Ensure LoadBalancer creation
    nginx.ingress.kubernetes.io/service-type: "LoadBalancer"
spec:
  ingressClassName: nginx
  rules:
    - HTTP:
        paths:
          - path: /?(.*)
            pathType: ImplementationSpecific
            backend:
              service:
                name: client-cluster-ip-service
                port:
                  number: 3000
          - path: /api/?(.*)
            pathType: ImplementationSpecific
            backend:
              service:
                name: server-cluster-ip-service
                port:
                  number: 5000
Copy and paste the content above on a new file, name it ingress-service.yaml, and apply it to our cluster.
kubectl apply –f ingress-service.yaml
To refresh the load balancer DNS link and should now have access to our web app running on the EKS cluster served via Ingress-NGINX.
You can test things around the website but remember that you might be billed for EKS and load balancer.
Delete your resources in this order

- Nodegroup
- load balancer
- EKS cluster
- iam roles and maybe the user
You don’t get charged for Iam and user access so you might not need to delete it.
Let us hear from you if you did this.
Conclusion
You have deployed a containerized app to an EKS cluster and configured it to use EC2 instances in a node group. You also set up an Ingress-NGINX to forward external traffic to the cluster through a load balancer. This is quite a standard setup for a Kubernetes cluster right now.
Share your comment below, and read other articles below.